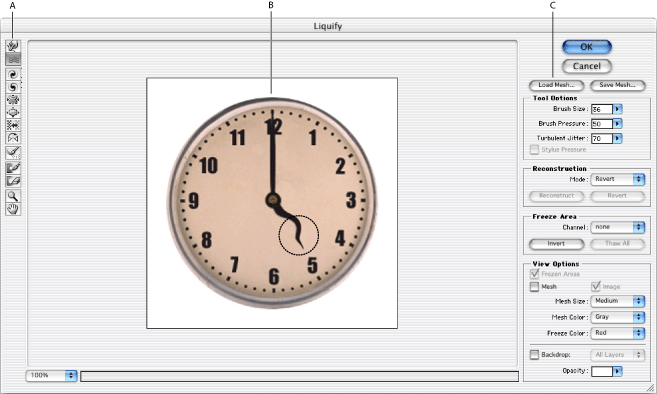
Using the Liquify dialog box
The Liquify dialog box provides tools and options for distorting an image.

Displaying the Liquify dialog box
Choose Filter > Liquify.
Magnifying and reducing the preview image
Select the zoom tool ![]() in the Liquify dialog box, and click or drag in the preview image to zoom in; hold down Alt (Windows) or Option (Mac OS), and click or drag in the preview image to zoom out. Alternatively, you can specify a magnification level in the Zoom text box at the bottom of the dialog box.
in the Liquify dialog box, and click or drag in the preview image to zoom in; hold down Alt (Windows) or Option (Mac OS), and click or drag in the preview image to zoom out. Alternatively, you can specify a magnification level in the Zoom text box at the bottom of the dialog box.
Navigating in the preview image
Select the hand tool ![]() in the Liquify dialog box, and drag in the preview image. Alternately, hold down the spacebar, and drag in the preview image.
in the Liquify dialog box, and drag in the preview image. Alternately, hold down the spacebar, and drag in the preview image.
Using a mesh
Adding a mesh helps you see and keep track of distortions. To add a mesh, select Mesh in the View Options section of the dialog box, and choose a mesh size, mesh color, and freeze color. To hide the mesh, deselect Mesh.
When Mesh is selected, you can show or hide the preview image. Select Image in the View Options section of the dialog box to show the preview image; deselect Image to view only the mesh.
Displaying layers in the preview image
To show only the active layer in the preview image, deselect Add Backdrop (Windows) or Backdrop (Mac OS) in the View Options section of the dialog box. To show additional layers in the preview image, select Add Backdrop (Windows), or Backdrop (Mac OS), specify an overlay opacity, and choose an option from the pop-up menu.
Note: Only the active layer is distorted, even if other layers are displayed.