Entering paragraph type
When you enter paragraph type, the lines of type wrap to fit the dimensions of the bounding box. You can enter multiple paragraphs and select a paragraph justification option.
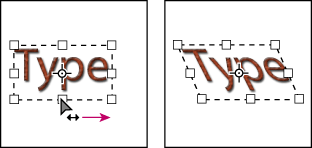
You can resize the bounding box, which causes the type to reflow within the adjusted rectangle. You can adjust the bounding box while you're entering type or after you create the type layer. You can also rotate, scale, and skew type using the bounding box.
To enter paragraph type:
- Do one of the following:
- (Photoshop) Select the horizontal type tool
 or the vertical type tool
  .
. - (ImageReady) Select the type tool
 .
. - Do one of the following:
- Drag diagonally to define a bounding box for the type.
- Hold down Alt (Windows) or Option (Mac OS) as you click or drag to display the Text Box Size dialog box. Enter values for Width and Height, and click OK.
- Select additional type options in the options bar, Character palette, Paragraph palette, and Layer > Type submenu. (See Formatting characters and Formatting paragraphs.)
- Enter the characters you want. Press Enter on the main keyboard (Windows) or Return (Mac OS) to begin a new paragraph. If you enter more type than can fit in the bounding box, the overflow icon
 appears on the bounding box.
 - (Photoshop) If desired, resize, rotate, or skew the bounding box.
- (Photoshop) Commit the type layer. (See About using the type tools (Photoshop).)
The type you entered appears in a new type layer.
To resize or transform a type bounding box:
- Display the bounding box handles:
- (Photoshop) With the type tool active, select the type layer in the Layers palette, and click in the text flow in the image.
- (ImageReady) With the type tool active, select the type layer. If the bounding box handles don't appear, make sure that the Text Bounds option is selected in the View > Show submenu.
- Drag to achieve the desired effect:
- To resize the bounding box, position the pointer over a handle--the pointer turns into a double arrow
 --and drag. Shift-drag to maintain the proportion of the bounding box.
 - (Photoshop) To rotate the bounding box, position the pointer outside of the bounding border--the pointer turns into a curved, two-sided arrow
 --and drag. Shift-drag to constrain the rotation to 15° increments. To change the center of rotation, Ctrl-drag (Windows) or Command-drag (Mac OS) the center point to a new location. The center point can be outside the bounding box.
 - (Photoshop) To skew the bounding box, hold down Ctrl+Shift (Windows) or Command+Shift (Mac OS) and drag a side handle. The pointer turns into an arrowhead with a small double arrow
 .
. - (Photoshop) To scale the type as you resize the bounding box, Ctrl-drag (Windows) or Command-drag (Mac OS) a corner handle.

Note: You can also transform type layers using the transformation commands in the Edit menu, except for Perspective and Distort.
To show or hide the type bounding box (ImageReady):
- Choose View > Show > Text Bounds.
- Choose View > Extras. This command shows or hides all selected items in the View > Show submenu. (See Working with Extras.)
Do one of the following: