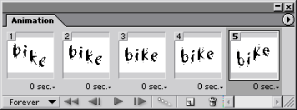
Tweening frames
You use the Tween command to automatically add or modify a series of frames between two existing frames--varying the layer attributes (position, opacity, or effect parameters) evenly between the new frames to create the appearance of movement. For example, if you want to fade out a layer, set the opacity of the layer in the starting frame to 100%; then set the opacity of the same layer in the ending frame to 0%. When you tween between the two frames, the opacity of the layer is reduced evenly across the new frames.
The term "tweening" is derived from "in betweening," the traditional animation term used to describe this process. Tweening significantly reduces the time required to create animation effects such as fading in or fading out, or moving an element across a frame. You can edit tweened frames individually after you create them.
To create frames using tweening:
- To apply tweening to a specific layer, select it in the Layers palette.
- Select a single frame or multiple contiguous frames.
- Do one of the following:
- Click the Tween button
 in the Animation palette.
 - Select Tween from the Animation palette menu.
- Specify the layer or layers to be varied in the added frames:
- All Layers to vary all layers in the selected frame or frames.
- Selected Layer to vary only the currently selected layer in the selected frame or frames.
- Specify layer attributes to be varied:
- Position to vary the position of the layer's content in the new frames evenly between the beginning and ending frames.
- Opacity to vary the opacity of the new frames evenly between the beginning and ending frames.
- Effects to vary the parameter settings of layer effects evenly between the beginning and ending frames.
- If you selected a single frame in step 2, choose where to add frames from the Tween With menu:
- Next Frame to add frames between the selected frame and the following frame. This option is not available when you select the last frame in the Animation palette.
- First Frame to add frames between the last frame and first frame. This option is only available if you select the last frame in the Animation palette.
- Previous Frame to add frames between the selected frame and the preceding frame. This option is not available when you select the first frame in the Animation palette.
- Last Frame to add frames between the first frame and last frame. This option is only available if you select the first frame in the Animation palette.
- Enter a value, or use the Up or Down Arrow key to choose the number of frames to add. (This option is not available if you selected more than two frames. In this case, the tweening operation alters the existing frames between the first and last frames in the selection.)
- Click OK.
If you select a single frame, you choose whether to tween the frame with the previous frame or the next frame. If you select two contiguous frames, new frames are added between the frames. If you select more than two frames, existing frames between the first and last selected frames are altered by the tweening operation. If you select the first and last frames in an animation, these frames are treated as contiguous, and tweened frames are added after the last frame. (This tweening method is useful when the animation is set to loop multiple times.)
Note: You cannot select discontiguous frames for tweening.