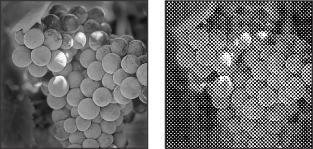
Specifying halftone screens for Bitmap-mode images
The Halftone Screen option in the Bitmap dialog box lets you convert a grayscale image to simulated halftone dots.
Important: The halftone screen becomes part of the image. If you print the image on a halftone printer, it will print with the halftone screen you choose here plus that of the printer. On some printers, the result probably will be a moiré pattern in the image.
To specify the halftone screen for a Bitmap-mode image:
- Choose Image > Mode > Bitmap.
- Click Halftone Screen; then click OK.
- For Frequency, enter a value for the screen frequency, and choose a unit of measurement. Values can range from 1 to 999 for lines per inch and from 0.400 to 400 for lines per centimeter. You can enter decimal values.
- Enter a value for the screen angle in degrees from -180 to +180.
- For Shape, choose the dot shape you want.
The screen frequency specifies the ruling of the halftone screen in lines per inch (lpi). The frequency depends on the paper stock and type of press used for printing. Newspapers commonly use an 85-line screen. Magazines use higher resolution screens, such as 133 lpi and 150 lpi. Check with your print shop for correct screen frequencies.
The screen angle refers to the orientation of the screen. Continuous-tone and black-and-white halftone screens commonly use a 45° angle.

You can save and reuse halftone screen settings by using the Save and Load buttons in the Halftone Screen dialog box.