Soft-proofing colors
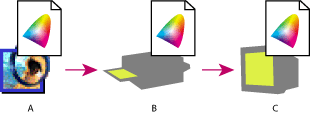
In a traditional publishing workflow, you print a hard proof of your document to preview how the document's colors will look when reproduced on a specific output device. In a color-managed workflow, you can use the precision of color profiles to soft-proof your document directly on the monitor--to display an on-screen preview of the document's colors as reproduced on a specified device. In addition, you can use your printer to produce a hard-proof version of this soft proof. (See Using color management when printing.) The following diagram shows how the source document profile, proof profile, and monitor profile are used to represent colors in a soft proof.
Keep in mind that the reliability of the soft proof is highly dependent upon the quality of your monitor, your monitor and printer profiles, and the ambient lighting conditions of your work station. (See Creating an ICC monitor profile.)
To display a soft proof:
- Choose View > Proof Setup, and choose the proof profile space that you want to simulate:
- Custom soft-proofs colors using the color profile of a specific output device. Follow the instructions after this procedure to set up the custom proof.
- Working CMYK soft-proofs colors using the current CMYK working space as defined in the Color Settings dialog box.
- Working Cyan Plate, Working Magenta Plate, Working Yellow Plate, Working Black Plate, or Working CMY Plates soft-proofs specific CMYK ink colors using the current CMYK working space.
- Macintosh RGB or Windows RGB soft-proofs colors in an image using either a standard Mac OS or Windows monitor as the proof profile space to simulate. Neither option is available for Lab or CMYK documents.
- Monitor RGB soft-proofs colors in an RGB document using your current monitor color space as the proof profile space. This option is unavailable for Lab and CMYK documents.
- Simulate Paper White previews the specific shade of white exhibited by the print medium defined by a document's profile. This option is not available for all profiles and is available only for soft-proofing, not printing.
- Simulate Ink Black previews the actual dynamic range defined by a document's profile. This option is not available for all profiles and is available only for soft-proofing, not printing.
- Choose View > Proof Colors to turn the soft-proof display on and off. When soft proofing is on, a check mark appears next to the Proof Colors command.
When soft proofing is on, the name of the current proof profile appears next to the color mode in the document's title bar.
To create a custom proof setup:
- Choose View > Proof Setup > Custom.
- Select Preview to display a live preview of the proof settings in the document while the Proof Setup dialog box is open.
- To use a preset proof setup as a starting point, choose it from the Setup menu. If the desired setup does not appear in the menu, click Load to locate and load the setup.
- For Profile, choose the color profile for the device for which you want to create the proof.
- If the proof profile you chose uses the same color mode as the document, do one of the following:
- Select Preserve Color Numbers to simulate how the document will appear without converting colors from the document space to the proof profile space. This simulates the color shifts that may occur when the document's color values are interpreted using the proof profile instead of the document profile.
- Deselect Preserve Color Numbers to simulate how the document will appear if colors are converted from the document space to their nearest equivalents in the proof profile space in an effort to preserve the colors' visual appearances. Then specify a rendering intent for the conversion. (See Specifying a rendering intent.)
- If needed, select any of the following:
- Simulate Paper White to preview, in the monitor space, the specific shade of white exhibited by the print medium described by the proof profile. Selecting this option automatically selects the Simulate Ink Black option.
- Simulate Ink Black to preview, in the monitor space, the actual dynamic range defined by the proof profile.
- To save your custom proof setup as a preset proof setup, click Save. To ensure that the new preset appears in the View > Proof Setup menu, save the preset in the Program Files/Common Files/Adobe/Color/Proofing folder (Windows), System Folder/Application Support/Adobe/ Color/Proofing folder (Mac OS 9.x), or Library/Application Support/Adobe/Color/ Proofing folder (Mac OS X).
![]() If you want the custom proof setup to be the default proof setup for documents, close all document windows before choosing the View > Proof Setup > Custom command.
If you want the custom proof setup to be the default proof setup for documents, close all document windows before choosing the View > Proof Setup > Custom command.
The availability of these options depends on the proof profile chosen. Not all profiles support both options.