Using the Hue/Saturation command
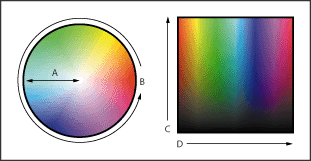
The Hue/Saturation command lets you adjust the hue, saturation, and lightness of the entire image or of individual color components in an image. Adjusting the hue, or color, represents a move around the color wheel. Adjusting the saturation, or purity of the color, represents a move across its radius.

You can also use the Colorize option to add color to a grayscale image converted to RGB, or to an RGB image--for example, to make it look like a duotone by reducing its color values to one hue.
To use the Hue/Saturation command:
- Open the Hue/Saturation dialog box. (See Making color adjustments.)
- (Photoshop) For Edit, choose which colors to adjust:
- Choose Master to adjust all colors at once.
- Choose one of the other preset color ranges listed for the color you want to adjust. An adjustment slider appears between the color bars, which you can use to edit any range of hues. (For information on how to modify the slider's range, see the instructions following this procedure.)
- For Hue, enter a value or drag the slider until the colors appear as you want.
- For Saturation, enter a value or drag the slider to the right to increase the saturation or to the left to decrease it.
- For Lightness, enter a value or drag the slider to the right to increase the lightness or to the left to decrease it. Values can range from -100 to +100.
The two color bars in the dialog box represent the colors in their order on the color wheel. The upper color bar shows the color before the adjustment; the lower bar shows how the adjustment affects all of the hues at full saturation.
The values displayed in the text box reflect the number of degrees of rotation around the wheel from the pixel's original color. A positive value indicates clockwise rotation, a negative value counterclockwise rotation. Values can range from -180 to +180.
The color shifts away from or toward the center of the wheel, relative to the beginning color values of the selected pixels. Values can range from -100 to +100.
To modify the range of an adjustment slider (Photoshop):
- Choose an individual color from the Edit menu in the dialog box.
- Do any of the following to the adjustment slider:
- Drag one of the white triangles to adjust the amount of color fall-off without affecting the range.
- Drag the area between the triangle and the vertical bar to adjust the range without affecting the amount of fall-off.
- Drag the center area to move the entire adjustment slider, selecting a different color area.
- Drag one of the vertical white bars next to the dark gray area to adjust the range of the color component. Increasing the range decreases the fall-off, and vice versa.
- Ctrl-drag (Windows) or Command-drag (Mac OS) the color bar so that a different color is in the center of the bar.
- To edit the range by choosing colors from the image, select the eyedropper tool
 in the dialog box and click in the image. Use the eyedropper + tool to add to the range; use the eyedropper - tool to subtract from the range.

If you modify the adjustment slider so that it falls into a different color range, the name changes to reflect this. For example, if you choose Yellow and alter its range so that it falls in the red part of the color bar, the name changes to Red 2. You can convert up to six of the individual color ranges to varieties of the same color range (for example, Red through Red 6).
Note: By default, the range of color selected when you choose a color component is 30° wide, with 30° of fall-off on either side. Setting the fall-off too low can produce banding in the image.
While the eyedropper tool is selected, you can also press Shift to add to the range or Alt (Windows) or Option (Mac OS) to subtract from it.
To colorize a grayscale image or create a monotone effect:
- (Photoshop) If you are colorizing a grayscale image, choose Image > Mode > RGB Color to convert the image to RGB.
- Open the Hue/Saturation dialog box. (See Making color adjustments.)
- Select Colorize. The image is converted to the hue of the current foreground color, if the foreground color is not black or white. The lightness value of each pixel does not change.
- Use the Hue slider to select a new color if desired. Use the Saturation and Lightness sliders to adjust the saturation and lightness of the pixels.