Using Levels to set highlights, shadows, and midtones
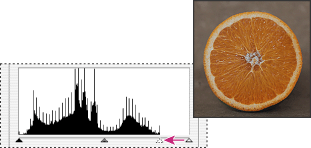
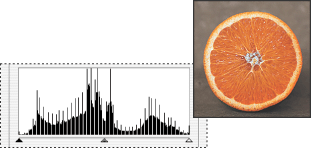
You can set the highlights and shadows in an image by moving Input sliders to the first group of pixels on both ends of the Levels histogram. This maps these pixels--the darkest and lightest pixels in each channel--to black and white, increasing the tonal range of the image. The corresponding pixels in the other channels are adjusted proportionately to avoid altering the color balance. You can use the middle Input slider to change the intensity values of the middle range of gray tones without dramatically altering the highlights and shadows.
Although the Levels sliders are not as exact as assigning target values or using the Curves dialog box, they often yield good results.
To adjust tonal range using Levels:
- Open the Levels dialog box. (See Making color adjustments.)
- To adjust tones for a specific color channel, choose an option from the Channel menu.
- To adjust the shadows and highlights manually, do one of the following:
- Drag the black and white Input Levels sliders to the edge of the first group of pixels on either end of the histogram. You can also enter values directly into the first and third Input Levels text boxes.
- Drag the black and white Output Levels sliders to define new shadow and highlight values. You can also enter values directly in the Output Levels text boxes.
- To adjust the shadows and highlights automatically, click Auto.
- If your image needs midtone corrections, use the gray Input Levels slider. Drag the slider to the right to darken the midtones; drag it to the left to lighten the midtones. You can also enter values directly in the middle Input Levels text box.
- Click OK.
- To view the adjusted histogram, reopen the Levels dialog box.
To edit a combination of color channels at the same time, Shift-select the channels in the Channels palette before choosing the Levels command. The Channel menu then displays the abbreviations for the target channels--for example, CM for cyan and magenta. The menu also contains the individual channels for the selected combination. You can only edit spot channels and alpha channels individually.
For example, suppose you want to increase the contrast in an image with pixels that currently cover a range of only 0-233. If you drag the Input Levels white triangle to 233, pixels with intensity values of 233 and higher (in each channel of the image) are mapped to 255; pixels with lower intensity values are mapped to corresponding lighter values. This remapping lightens the image, increasing the contrast in highlight areas.


Suppose instead you want to decrease the contrast in the image. If you drag the Output Levels white triangle to 220, pixels with intensity values of 255 are remapped to 220, and pixels with lower intensity values are mapped to corresponding darker values. This darkens the image, decreasing the contrast in highlight areas.
In Photoshop, clicking Auto applies settings specified in the Auto Correction Options dialog box. For more information, see Setting auto correction options (Photoshop). In ImageReady, clicking Auto is the same as using the Auto Levels command. (See Using the Auto Levels command.)
The gaps in the adjusted histogram do not indicate a perceptible problem in the image unless they are large or accompanied by a low pixel count.