Using the Curves dialog box (Photoshop)
Like the Levels dialog box, the Curves dialog box lets you adjust the entire tonal range of an image. But instead of making adjustments using only three variables (highlights, shadows, midtones), with Curves you can adjust any point along a 0-255 scale while keeping up to 15 other values constant. You can also use Curves to make precise adjustments to individual color channels in an image.
To adjust tonal range and color balance using Curves:
- Open the Curves dialog box. (See Making color adjustments.)
- To adjust the color balance of the image, choose the channel (or channels) you want to adjust from the Channel menu.
- To make the Curves grid finer, hold down Alt (Windows) or Option (Mac OS), and click the grid. Alt/Option-click again to make the grid larger.
- Click any points on the curve that you want to remain fixed. For example, if you want to adjust the midtones while minimizing the effect on the highlights and shadows, click the quarter and three-quarter points on the curve.
- Do any of the following to adjust the curve:
- Drag the curve until the image looks the way you want it.
- Click a point on the curve, and enter Input and Output values for the point.
- Select the pencil at the bottom of the dialog box, and drag to draw a new curve. You can hold down Shift to constrain the curve to a straight line, and click to define endpoints. When you're finished, click Smooth if you want to smooth the curve.
- Click Auto to adjust the image using the settings specified in the Auto Correction Options dialog box. For more information, see Setting auto correction options (Photoshop).
- Ctrl-click (Windows) or Command-click (Mac OS) in the image to set a point on the curve in the current channel specified in the Curves dialog box.
- Shift+Ctrl-click (Windows) or Shift+Command-click (Mac OS) in the image to set a point on the curve for the selected color in each color component channel (but not in the composite channel).
- Shift-click points on the curve to select multiple points. Selected points appear filled with black.
- Click in the grid, or press Ctrl-D (Windows) or Command-D (Mac OS) to deselect all points on the curve.
- Press arrow keys to move selected points on the curve.
- Press Ctrl+Tab (Windows) or Control+Tab (Mac OS) to move forward through control points on the curve.
- Press Shift+Ctrl+Tab (Windows) or Shift+Control+Tab (Mac OS) to move backward through control points on the curve.
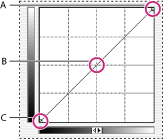
The horizontal axis of the graph represents the original intensity values of the pixels (Input levels); the vertical axis represents the new color values (Output levels). In the default diagonal line, all pixels have identical Input and Output values.
Note: For RGB images, Curves displays intensity values from 0 to 255, with shadows (0) on the left. For CMYK images, Curves displays percentages from 0 to 100, with highlights (0) on the left. To reverse the display of shadows and highlights at any time, click the double arrow below the curve.
To edit a combination of color channels at the same time, Shift-select the channels in the Channels palette before choosing Curves. The Channel menu then displays the abbreviations for the target channels--for example, CM for cyan and magenta. The menu also contains the individual channels for the selected combination.
You can add up to 14 control points to the curve, locking those values. To remove a control point, drag it off the graph, select it and press Delete, or Ctrl-click (Windows) or Command-click (Mac OS) it. You cannot delete the endpoints of the curve.
![]() To determine the lightest and darkest areas in the image, drag over the image. The intensity values of the area under the pointer, along with the corresponding location on the curve, are displayed in the Curves dialog box.
To determine the lightest and darkest areas in the image, drag over the image. The intensity values of the area under the pointer, along with the corresponding location on the curve, are displayed in the Curves dialog box.
The following shortcuts work with the Curves dialog box: