Creating smooth gradient fills
The Gradient Editor dialog box lets you define a new gradient by modifying a copy of an existing gradient. You can also add intermediate colors to a gradient, creating a blend between more than two colors.
To create a smooth gradient:
- Select the gradient tool
 .
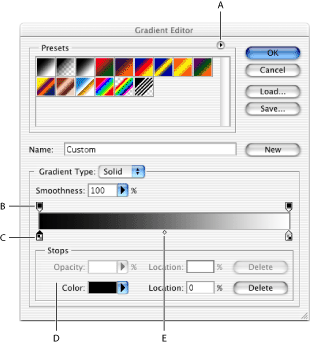
. - Click inside the gradient sample in the options bar to display the Gradient Editor dialog box.
- To base the new gradient on an existing gradient, select a gradient in the Presets section of the dialog box.
- Choose Solid from the Gradient Type pop-up menu.
- To define the starting color of the gradient, click the left color stop under the gradient bar. The triangle above the stop turns black, indicating that the starting color is being edited.
- To choose a color, do one of the following:
- Double-click the color stop, or click the color swatch in the Stops section of the dialog box. Choose a color, and click OK. For information on choosing a color, see Using the Adobe Color Picker.
- Choose an option from the Color pop-up menu in the Stops section of the dialog box.
- Position the pointer over the gradient bar (the pointer turns into the eyedropper), and click to sample a color, or click anywhere in the image to sample a color from the image.
- To define the ending color, click the right color stop under the gradient bar. Then choose a color as described in step 5.
- To adjust the location of the starting point or ending point, do one of the following:
- Drag the corresponding color stop left or right to the location you want.
- Click the corresponding color stop, and enter a value for Location in the Stops section of the dialog box. A value of 0% places the point at the far left end of the gradient bar, a value of 100% at the far right end.
- To adjust the location of the midpoint (where the gradient displays an even mix of the starting and ending colors), drag the diamond below the gradient bar to the left or right, or click the diamond and enter a value for Location.
- To delete the color stop you are editing, click Delete.
- To set the smoothness for the entire gradient, enter a value in the Smoothness text box, or drag the Smoothness pop-up slider.
- If desired, set transparency values for the gradient. (See Specifying the gradient transparency.)
- Enter a name for the new gradient.
- To save the gradient as a preset, click New after you have finished creating the gradient.
Note: New presets are saved in a Preferences file so that they persist between editing sessions. If this file is deleted or damaged, or if you reset presets to the default library, the new presets will be lost. To permanently save new presets, save them in a library. (See Managing gradients.)
To add intermediate colors to a gradient:
In the Gradient Editor dialog box, click below the gradient bar to define another color stop. Specify the color and adjust the location and midpoint for the intermediate point as you would for a starting or ending point. To remove an intermediate color, drag the color stop down and off the gradient bar, or select the color stop and click the Delete button.