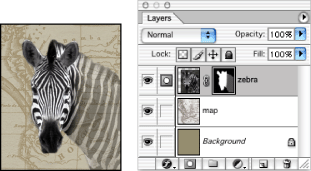
Creating and editing layer masks
You can obscure an entire layer or layer set, or just a selected part of it, using a layer mask. You can also edit a layer mask to add or subtract from the masked region. A layer mask is a grayscale image, so what you paint in black will be hidden, what you paint in white will show, and what you paint in gray shades will show in various levels of transparency.

To add a mask that shows or hides the entire layer:
- Choose Select > Deselect to clear any selection borders in the image.
- In the Layers palette, select the layer or layer set to which to add a mask.
- Do one of the following:
- To create a mask that reveals the entire layer, click the New Layer Mask
 button in the Layers palette, or choose Layer > Add Layer Mask > Reveal All.
 - To create a mask that hides the entire layer, Alt click (Windows) or Option-click (Mac OS) the New Layer Mask button, or choose Layer > Add Layer Mask > Hide All.
To add a mask that shows or hides a selection:
- In the Layers palette, select the layer or layer set to which to add a mask.
- Select the area in the image, and do one of the following:
- Click the New Layer Mask button
 in the Layers palette to create a mask that reveals the selection.
 - Choose Layer > Add Layer Mask > Reveal Selection or Hide Selection.
To edit a layer mask:
- Click the layer mask thumbnail in the Layers palette to make it active.
- Select any of the editing or painting tools.
- Do one of the following:
- To subtract from the mask and reveal the layer, paint the mask with white.
- To make the layer partially visible, paint the mask with gray.
- To add to the mask and hide the layer or layer set, paint the mask with black.
Note: The foreground and background colors default to grayscale values when the mask is active.
To edit the layer instead of the layer mask, select it by clicking its thumbnail in the Layers palette. The paintbrush icon ![]() appears to the left of the thumbnail to indicate that you are editing the layer.
appears to the left of the thumbnail to indicate that you are editing the layer.
![]() To paste a copied selection into a layer mask, Alt-click (Windows) or Option-click (Mac OS) the layer mask thumbnail in the Layers palette to select and display the mask channel. Choose Edit > Paste, drag the selection in the image to produce the desired masking effect, and choose Select > Deselect. Click the layer thumbnail in the Layers palette to deselect the mask channel.
To paste a copied selection into a layer mask, Alt-click (Windows) or Option-click (Mac OS) the layer mask thumbnail in the Layers palette to select and display the mask channel. Choose Edit > Paste, drag the selection in the image to produce the desired masking effect, and choose Select > Deselect. Click the layer thumbnail in the Layers palette to deselect the mask channel.
To select and display the layer mask channel (Photoshop):
- Alt-click (Windows) or Option-click (Mac OS) the layer mask thumbnail to view only the grayscale mask. The eye icons in the Layers palette are dimmed because all layers or layer sets are hidden. To redisplay the layers, Alt-click or Option-click the layer mask thumbnail, or click an eye icon.
- Hold down Alt+Shift (Windows) or Option+Shift (Mac OS), and click the layer mask thumbnail to view the mask on top of the layer in a rubylith masking color. Hold down Alt+Shift or Option+Shift, and click the thumbnail again to turn off the color display.
Do one of the following:
To disable or enable a layer mask:
- Shift-click the layer mask thumbnail in the Layers palette.
- Select the layer with the layer mask you want to disable or enable, and choose Layer > Disable Layer Mask or Layer > Enable Layer Mask.
Do one of the following:
A red X appears over the mask thumbnail in the Layers palette when the mask is disabled, and the layer's content appears without masking effects.
To change the rubylith display for a layer mask (Photoshop):
- Do one of the following:
- Alt-click (Windows) or Option-click (Mac OS) the layer mask thumbnail to select the layer mask channel; then double-click the layer mask thumbnail.
- Double-click the layer mask channel in the Channels palette.
- To choose a new mask color, in the Layer Mask Display Options dialog box, click the color swatch, and choose a new color. (See Using the Adobe Color Picker.)
- To change the opacity, enter a value between 0% and 100%.
- Click OK.
Both the color and opacity settings affect only the appearance of the mask and have no effect on how underlying areas are protected. For example, you might want to change these settings to make the mask more easily visible against the colors in the image.