Specify the video sequences that you want to capture with IN and OUT points. IN and OUT points are specified by clicking the [MARK] button while viewing a playback of the source tape. You can add IN and OUT points to an already existing IN/OUT list by performing the same procedure.
This topic explains the process of specifying IN and OUT points with the view set to [Thumbnail].
To begin, move the source tape position to the beginning of the video sequence that you want to capture and leave the device either in playback or pause mode.
While observing the time codes and the images being played back on the video display area, click the [MARK] button when the target starting image appears. This establishes the IN point and a image of this point is shown in the IN/OUT list. The time code display area shows the time code of the IN point and the elapsed time of the video playback from the IN point.
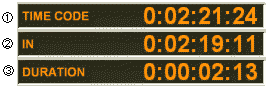
(1) Time code for the tape in the DV device (hour:minute:second:frame)
(2) Time code for the IN point (hour:minute:second:frame)
(3) Elapsed time since the IN point (hour:minute:second:frame)
Specify the OUT point.
Click the [MARK] button again when the target ending image appears. This establishes the OUT point. The IN/OUT list shows a image of the OUT point, the total length of the clip, and the size of the file.
Specify multiple clips to be captured.
You can capture multiple clips at the same time if they are on the same tape. Repeat steps 1 and 2 above to capture multiple clips.
You can cancel an IN or OUT point by clicking [CANCEL]. The last IN or OUT point in the IN/OUT list is canceled and the corresponding clip is removed from the IN/OUT list.
You can assign the [MARK] and [CANCEL] buttons to keys on the keyboard. Device Control Settings
Note
When capturing a file, 2 Gbytes is the maximum clip size that can be saved in a single file. This value can be changed to a smaller value through the [Capture Setting] dialog box. The file to be saved will be divided into two or more files as soon as the specified size (or its equivalent in duration) is reached.
If the IN and OUT points of the target clip have different sound modes, the clip is saved to another file that is created where the sound mode changes.
You are not able to specify the position of any copy-protected tape.
Capturing may fail if the IN point is specified at a non-recorded portion of the tape, although it is followed by a recorded portion. Try to always specify the IN point at least one second away from the non-recorded portion of the tape.
Capturing may fail, near the division where the tape is separated by recorded and non-recorded portions, if you specify the IN and OUT points with an intervening non-recorded portion between them. To avoid this, specify IN and OUT points without non-recorded portions between them.
The elapsed time displayed for IN and OUT points with an intervening non-recorded portion or with different record modes (SP/LP) is incorrect.