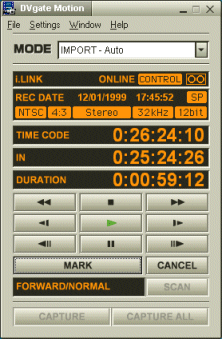
 Menu Bar
- The menu bar in the Main Window lists the commands that you can use in this window.
Menu Bar
 Mode Selector List
- If you click
 on the Mode Selector List, a menu listing all the different modes available in DVgate Motion appears.
DVgate Motion works in the following four modes:
| IMPORT-Auto | The Main Window (Capturing), IN/OUT List Window, and Monitor Window appear. This mode is used for batch capturing. Batch capturing refers to the process of having DVgate Motion automatically capture all the video sequences listed on the IN/OUT list. |
| IMPORT-Manual | The Main Window (Capturing) and Monitor Window appear.
This mode is used for manual capturing. Manual capturing refers to the process of manually executing the capture command for capturing video sequences while viewing the source image. |
| EXPORT-Auto | The Main Window (Recording), Record List Window and Monitor Window appear.
This mode is used for recording specified video sequences on a DV device by controlling the device remotely. |
EXPORT-Manual | The Main Window (Recording), Record List Window, and Monitor Window appear. This mode is especially used for manually recording video on non-DV devices. When in this mode, clicking the [RECORD] button activates the outputting of video files to the connected device, but does not actually start recording on the device. No Record command is sent to the connected device and DVgate Motion cannot control the device remotely.
In comparison to EXPORT-Auto, EXPORT-Manual has certain limitations. Some of those are listed below:
- No tape position synchronization is executed
- No Record command is issued
- No adjustments are made on the timing of sending data |
 Connected Device Display
- [ONLINE] is displayed when a DV device is connected to the i.LINK connector and the device is turned on.
[OFFLINE] appears when there is no DV device connected to the i.LINK connector or when the connected DV device is not turned on.
 : Lit when a tape is set in the DV device.
 : Lit when a DV device is connected to the computer through the i.LINK connector.
 Frame Data Display
- Displays information on the recorded video in the source tape.
The following items of information are displayed:
- Recording time and date
Displays the date and time the video was recorded (the recording year of video recorded before 1993 is not displayed correctly).
- Record mode (SP/LP)
Displays whether the tape was recorded in the SP or LP mode.
- Video format (NTSC/PAL)
Displays the video format that DVgate recognizes (NTSC or PAL, depending on the country of purchase)
- Aspect ratio
Displays the ratio of the height of the image to its width.
- Audio channel
Displays the recorded sound type (Stereo1 + Stereo2 or Stereo1 + Mono).
- Sampling rate
Displays the sound sampling rate. The higher the number, the better the sound quality.
- Number of quantization bits
Displays the number of sound quantization bits.
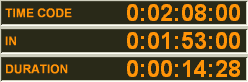 Time Code Display
- TIME CODE (Counter)
Indicates the position of the tape that is set in the DV device in the "hour:minute:second:frame" format.
IN (In)
Click [MARK] to specify the beginning of the video sequence you want to capture. That position is shown as the IN point in the "hour:minute:second:frame" format.
DURATION
Indicates elapsed time since the IN point in the "hour:minute:second:frame" format.
- DV Device Control
- These buttons are used to control the DV device.
 [Rewind/Review] Button
- Clicking this button when the DV device is in the stopped state rewinds the source tape.
Clicking this button during playback causes the DV device to rewind the source tape while playing.
 [Stop] Button
- Stops playback of the source tape.
 [Fast Forward/Cue] Button
- Clicking this button when the DV device is in the stopped state fast-forwards the source tape.
Clicking this button during playback causes the DV device to fast-forward the source tape while playing.
 [Slow Play Backward] Button
- Clicking this button during playback turns on the Slow Play Backward mode. You can toggle the play direction by clicking the Slow Play Forward button.
 [Play] Button
- Starts playback of the source tape.
 [Slow Play Forward] Button
- Clicking this button during playback turns on the Slow Play Forward mode. You can toggle the play direction by clicking the Slow Play Backward button.
 [Step Backward] Button
- Clicking this button during a pause plays the tape backwards by 1 frame.
Clicking this button during playback allows you to change the play direction.
 [Pause] Button
- Clicking this button causes the DV device to pause.
Clicking it again while it is on pause will play the tape.
You can advance the image in 1-frame units by moving the wheel of the mouse (a mouse equipped with a wheel) in the backward direction (toward you) during play, and retreat backward in 1-frame units by moving the mouse in the forward direction (away from you).
 [Step Forward] Button
- Clicking this button during a pause advances the tape by 1 frame.
 [MARK] Button
- Clicking this button specifies the IN and OUT points of the video sequence to be captured in the [IMPORT-Auto] mode.
 [MARK Cancel] Button
- Clicking this button cancels the last IN or OUT point on the IN/OUT list in [IMPORT-Auto] mode.
 Scan Settings Display
- Shows the settings that are defined in the [Rec.Start/Rec.End scan settings] dialog box, which is accessed by choosing [Settings]-[Scan...] from the menu bar in the Main Window.
FORWARD: Appears when forward scanning is specified.
BACKWARD: Appears when backward scanning is specified.
NORMAL: Appears when standard speed scanning is specified.
FASTEST: Appears when scanning with Fast Forward/Cue or Rewind/Review is specified.
 [SCAN] Button
- This button is used to start the scanning of recording start and the end points in IMPORT-Auto mode.
 [CAPTURE] Button
- This button is used to start capturing video sequences whose IN and OUT points are displayed in the IN/OUT list in IMPORT-Auto mode and capturing video sequences manually in IMPORT-Manual mode. The captured clips are stored as a video file or a sound file (*.wav).
 [CAPTURE ALL] Button
- This button is used to start capturing all video sequences whose IN and OUT points are displayed in the IN/OUT list in IMPORT-Auto mode. The captured clips are stored as a video file or a sound file (*.wav).
[Keyword]
ƒƒCƒ“ƒEƒBƒ“ƒhƒEiƒLƒƒƒvƒ`ƒƒŽžj