Home
Sony DVgate Manual
Getting Started
Trademarks
Using DVgate for Video Editing
What You Can Do With DVgate
How To (Reference by Task)
The Structure of DVgate
Configuring Your Computer For Use With DVgate. (Important. Please read.)
When the OS on your computer is Windows 2000
When the OS on your computer is Windows XP
Capturing Video (DVgate Motion)
The Capturing Process (Scanning and Capturing)
Launching and Exiting
Launching
Exiting
DVgate Motion: Components and Their Functions
Main Window (Capturing)
IN/OUT List Window
Monitor Window
Checking the Connection
Specifying the IN and OUT Points (Creating an IN/OUT List)
Required Settings
Scanning Automatically
Specifying the IN and OUT Points Manually
Editing the IN/OUT List
Playing and checking the contents of the IN/OUT list<
Saving and Opening an IN/OUT List
Capturing Video
Required Settings
Setting File Storage Parameters
Device Control Settings
Capturing
About Capture Modes
Capturing Automatically
Viewing the Video Sequences While Capturing Them by Direct Manipulation of the DV Device
Menu Bar
Capturing Video Images as Still Images (DVgate Still)
The Capturing Process
Launching and Exiting
Launching
Exiting
DVgate Still: Components and Their Functions
Main Window
Monitor Window
Still Window
Checking the Connection
Capturing Images
Setting the Capture Mode
Capturing
Saving Captured Images
Using PictureGear
Menu Bar
Editing Captured Video (DVgate Assemble)
The Editing Process
Launching and Exiting
Launching
Exiting
DVgate Assemble: Components and their Functions
Main Window
Preview Window
Monitor Window
Editing Video
Arranging in Order the Files to be Spliced Together
Editing the Assemble list
Saving/Opening a Assemble list
Defining the Exact Scenes
Inserting Still Images
Previewing
Saving the Edited Video
Required Settings
Saving
Menu Bar
Recording Edited Video on a DV Device (DVgate Motion)
The Recording and Data Output Process
Launching and Exiting
Launching
Exiting
DVgate Motion: Components and Their Functions
Main Window (Data Output)
Record List Window
Monitor Window
Preview Window
Checking the Connection
Outputting Video for Recording on a DV device
Required Settings for Output
Adjusting Recording Correction Values
Device Control Settings
Choosing Files for Output
Editing the Record List
Saving/Opening a Record List
Previewing Files for Output
Recording on the DV Device
About Record Modes
Recording Automatically
Recording Manually
Menu Bar
Other Information
Using the Jog DialUsing the Jog Dial (only with SONY made computers)
Using the Jog Dial with DVgate Motion
Using the Jog Dial with DVgate Still
Using the Jog Dial with DVgate Assemble
Glossary
General Specifications
Troubleshooting
Limitations and Cautions
Checklist Before Contacting Customer Support

Defining the Exact Scenes


You can edit the AVI files in the Assemble list for the exact scenes that you want to use.
For example, there is no need to recapture files even if you only want to use one particular scene from a longer video sequence originally captured through DVgate Motion.

Note

The process of removing the exact scene is only enabled when one AVI file is selected from the Assemble list.
However, this command is disabled when more than one file are selected.
  1. Select from the Assemble list the AVI file you want to edit.
  2. Choose [Edit a clip...] from the [Edit] menu.
    The [DVgate Assemble - Clip] dialog box appears.

    Hint

    Click [>>], and a detailed description of the selected AVI file is shown.
  3. Click the [PREVIEW] button.
    The selected file's video sequence is played back.
    You can manipulate the preview by using the controls in the [Clip] dialog box, as defined below.
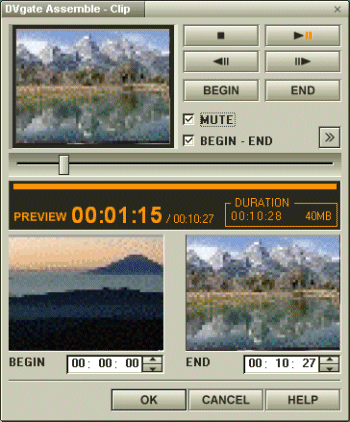

    [BEGIN-END]: Determines whether the selected file would preview from beginning to end, or if the preview should only last from the BEGIN point to the END point that you specify. When this check box is selected, the preview plays from the beginning of the file to the end of the file. When it is not selected, the preview starts at a specified BEGIN point and ends at a specified END point.
    [MUTE]: Specifies whether recorded sound data is to be played back in synchronization with video during playback.
    [Play/Pause]: Starts or pauses playback.
    [Stop]: Stops playback and places the starting playback position at the beginning of the AVI file.
    [Step Backward]: Steps backward by one frame.
    [Step Forward]: Advances by one frame.
    Slider: Indicates the playback position of the file. You can drag this slider to move the playback position.
    [BEGIN]: Specifies the BEGIN point.
    [END]: Specifies the END point.

    Hint

    You can move the playback position to the BEGIN point or the END point by clicking on the BEGIN point or END point of the image.
  4. Click the [BEGIN] button when you see the scene that you want to designate as the BEGIN point.
    The BEGIN point image and the time code appear in the bottom portion of the dialog box.

    Hint

    You can make fine adjustments to the BEGIN point by clicking the up and down arrows on the right of the time code.
  5. Click the [END] button when you see the scene that you want to designate as the END point.
    The END point image and the time code appear in the bottom portion of the dialog box.

    Hint

    You can make fine adjustments to the END point by clicking the up and down arrows shown on the right of the time code.
  6. Click [OK].
[Keyword] ê–ʂ̐؂èŽæ‚è