Home
Sony DVgate Manual
Getting Started
Trademarks
Using DVgate for Video Editing
What You Can Do With DVgate
How To (Reference by Task)
The Structure of DVgate
Configuring Your Computer For Use With DVgate. (Important. Please read.)
When the OS on your computer is Windows 2000
When the OS on your computer is Windows XP
Capturing Video (DVgate Motion)
The Capturing Process (Scanning and Capturing)
Launching and Exiting
Launching
Exiting
DVgate Motion: Components and Their Functions
Main Window (Capturing)
IN/OUT List Window
Monitor Window
Checking the Connection
Specifying the IN and OUT Points (Creating an IN/OUT List)
Required Settings
Scanning Automatically
Specifying the IN and OUT Points Manually
Editing the IN/OUT List
Playing and checking the contents of the IN/OUT list<
Saving and Opening an IN/OUT List
Capturing Video
Required Settings
Setting File Storage Parameters
Device Control Settings
Capturing
About Capture Modes
Capturing Automatically
Viewing the Video Sequences While Capturing Them by Direct Manipulation of the DV Device
Menu Bar
Capturing Video Images as Still Images (DVgate Still)
The Capturing Process
Launching and Exiting
Launching
Exiting
DVgate Still: Components and Their Functions
Main Window
Monitor Window
Still Window
Checking the Connection
Capturing Images
Setting the Capture Mode
Capturing
Saving Captured Images
Using PictureGear
Menu Bar
Editing Captured Video (DVgate Assemble)
The Editing Process
Launching and Exiting
Launching
Exiting
DVgate Assemble: Components and their Functions
Main Window
Preview Window
Monitor Window
Editing Video
Arranging in Order the Files to be Spliced Together
Editing the Assemble list
Saving/Opening a Assemble list
Defining the Exact Scenes
Inserting Still Images
Previewing
Saving the Edited Video
Required Settings
Saving
Menu Bar
Recording Edited Video on a DV Device (DVgate Motion)
The Recording and Data Output Process
Launching and Exiting
Launching
Exiting
DVgate Motion: Components and Their Functions
Main Window (Data Output)
Record List Window
Monitor Window
Preview Window
Checking the Connection
Outputting Video for Recording on a DV device
Required Settings for Output
Adjusting Recording Correction Values
Device Control Settings
Choosing Files for Output
Editing the Record List
Saving/Opening a Record List
Previewing Files for Output
Recording on the DV Device
About Record Modes
Recording Automatically
Recording Manually
Menu Bar
Other Information
Using the Jog DialUsing the Jog Dial (only with SONY made computers)
Using the Jog Dial with DVgate Motion
Using the Jog Dial with DVgate Still
Using the Jog Dial with DVgate Assemble
Glossary
General Specifications
Troubleshooting
Limitations and Cautions
Checklist Before Contacting Customer Support

Arranging in Order the Files to be Spliced Together


This topic explains how you can create an Assemble list with files you want to splice together and how you can edit the list.

This topic explains how to add AVI and still image files to the Assemble list.
You can later splice the files together in the order that they are added.

You can add files in one of the following three ways:

Use the [ADD] button.

  1. Click [ADD].
    The [Open] dialog box appears.

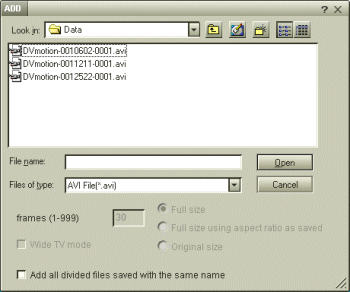
    • When you choose AVI file as the file type.
    If you choose [Add all divided files saved with the same name], DVgate Assemble will add all serially numbered files with the same name to the list. Serially numbered files are files that are created when DVgate Motion saves files that are split and applies consecutive numbers to them. The numbers of the split files have 4 digits and increase one unit at a time starting with 0001.
    • When you choose still image as the file type.
    The specified frame is displayed.
    When you output files in the wide mode (aspect ratio of 16:9) check the [Wide TV mode] check box.
    Also, you can set whether the aspect ratio will change, in relation to the original size of the still image, when the file is output.
    [Full size]: Reduces or enlarges the image area to the full screen. The aspect ratio may change.
    [Full size using aspect ratio as saved]: The aspect ratio is unchanged while the image is enlarged or reduced to the full screen.
    [Original size] Does not enlarge or reduce the original size.
  2. Select a file and click [Open].

Specify from a menu.

Specify from a menu.

Specify the file to splice by dragging its icon from Explorer.

  1. Position the pointer over the desired icon shown in Explorer and click it.
    The file's icon is selected.
  2. Position the pointer over the selected icon and press down the mouse button.
  3. While holding down the mouse button, drag the icon into the list box in the DVgate Assemble window and release the mouse button.
    The file is added to the Assemble list.

Hint

  • Imported files are added to the end of the Assemble list.
  • You can add video files of the AVI (DV CODEC) format, and still image files of the BMP, JPEG, and GIF formats only.
  • When you add a still image file (BMP, JPEG, or GIF icon) by dragging it into the list box in the DVgate Assemble Window, the number of frames, converted size, and size conversion mode are shown as follows:
    Number of still picture frames: 30
    Converted size: 640 x 480 (Wide TV Mode turned off)
    Size Conversion mode: Full screen
  • You can play, with no distortion, any file that is selected in the Wide TV Mode and saved in the AVI format using DVgate Motion if you use a digital video camera that can recognize Wide TV mode images. You can play such a file on a TV set with no distortion if the TV set is capable of recognizing Wide TV mode images.
[Keyword] アセンブルリストの作成